
Searches on the internet for IT band stretches are at an all-time high, and previous posts have covered the basics and essentials: including full descriptions of the anatomy, function, assessments, and common conditions - as seen in IT Band Syndrome Exercises.
The following program was created to offer an individualized approach to IT band stretching, making them even more effective. Performing self-assessment is key to finding where an individual’s specific restrictions are so that the stretch fits the person and how that person feels on a particular day, like after a workout.
Feeling tight or not performing optimally will often change from day to day, and this program was designed with that fact in mind.
If you are on a learning kick, consider checking out the NASM Stretching and Flexibility Coach Program - or our free mini course on the Scientific Rationale for Stretching
Stretching on the ground
The following stretches are designed to be done on the ground, whether outdoors or indoors. If done indoors, an exercise mat or other covering for comfort may help if needed.
These stretches may also be done in the bed if getting down to or up from the floor is difficult. The stretches were designed to be performed in the order as noted for optimal comfort, safety, and effectiveness.
Glute-IT Band stretch
This movement assesses and, if needed, stretches the glute and its connection into the posterior IT band down to the knee. Movement starts at the hip connection.
General tips:
- First, one should test each stretch to see any lack of ease in movement, e.g., tightness, stiffness, heaviness, or just stuck. If not, then one should skip it and go to the next stretch to test that one and so on with each stretch.
- Inhale before going into the stretch, then exhale slowly while moving into the stretch. Inhale coming out of the stretch, then exhale again into the stretch. Never hold your breath!
- Keeping the intensity of the stretch light will result in a more excellent range of motion than forcing it.
- Feel free to be fluid during stretching by trying slightly different angles or even swaying a little bit. Whenever possible, move in a wave-like fashion and avoid being stiff or rigid.
- There is no perfect stretch position, so feel free to modify each stretch if it does not create pain, other discomfort, or produces stiffness.
- There is no set number of repetitions, as imbalances between left, right, front and back of the body are common. It is more effective to repeat as many repetitions as possible to improve the efficiency, quality, and ease of movement. When no further gains are achieved, then stop and move on to the next stretch. Further gains will be achieved over time with consistent stretching.
- NEVER stretch in pain! If there is any pain, stop and see a health professional like a physical therapist.
Step 1: Focus on low back-hip-IT band connections
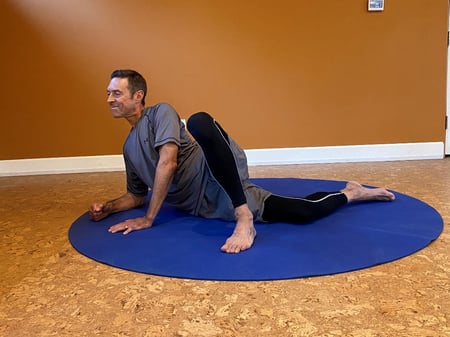
- Place one leg in front and one behind, and bring the front foot inward until the foot touches the back knee, if possible but not necessary (see Fig. 1a).
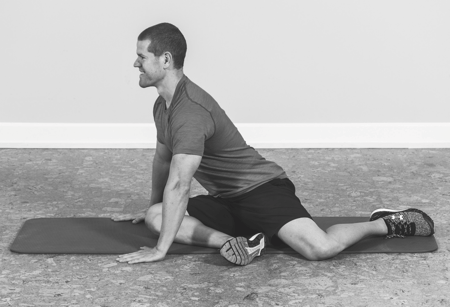
Position one’s weight so one is sitting more on the glute of the front leg. Make adjustments for comfort. Place hands in a push-up position in front with the arms straight. - Inhale and lengthen the whole spine up through the top of the head; then, exhale and move down and forward over the knee, keeping the spine long (see Fig. 1b-c).

If any pinching occurs in the front hip, then change the angle and stretch to the outside of the front knee. - Roll up through a flexed spine back to the erect starting position; head last to roll up (Fig. 1a).
- Repeat, swaying the torso forward to the left and right of the knee at different angles to target the different glute fibers attaching to the IT band in the hip region.
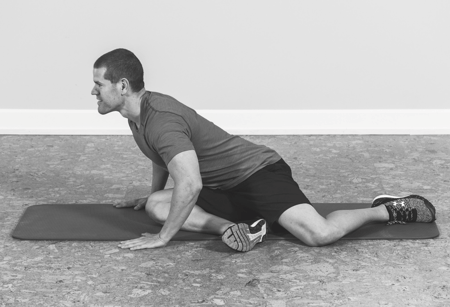
Step 2: Focus on the middle part of the posterior IT band
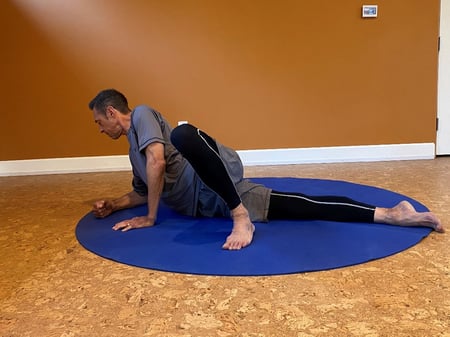
- From the start position in Step 1, open up and extend the knee slightly until it’s at about a right angle (90 degrees; see Fig. 1d).
- Repeat same movements in Step 1 in this new position.
- The stretch should be felt further down the back and/or side of the thigh.
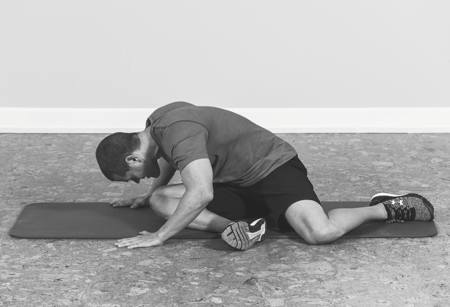
Step 3: Focus on the posterior IT band attaching distally at the knee
- From the Step 2 position, open up and extend the knee further until (at the most) a very mild stretch is felt. Some will not be able to open up much, while others will be able to nearly straighten if not fully straighten their knee. This is specific to the individual and not a problem.
- Repeat same movements as in Step 1, however since more tissue is under stretch, less movement is to be expected. Due to the increased stretch, use more caution and less force.
Central IT Band stretch
This movement assesses and stretches the IT band from its center outward. Slightly rotating the pelvis toward the floor will emphasize the anterior part of the IT band connection. Rotating away from the floor will emphasize the posterior part of the IT band connection.
Step 1 Focus on central IT Band
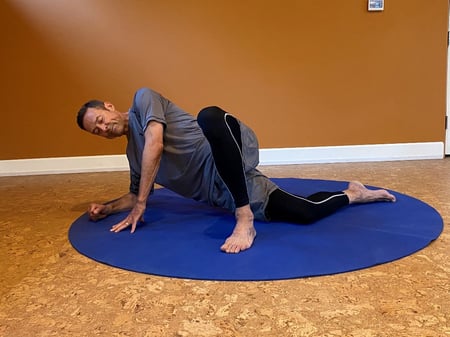
- Get into a modified side plank position (Fig. 2a),
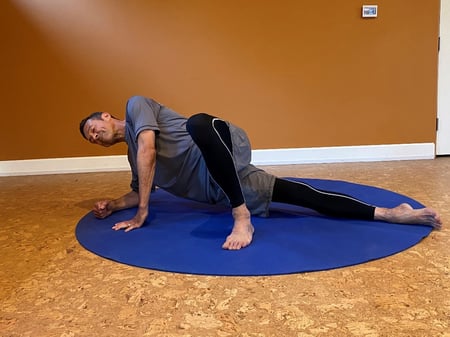
then slowly drop hip to the floor (or as close as possible to feel a gentle to moderate stretch (Fig. 2b).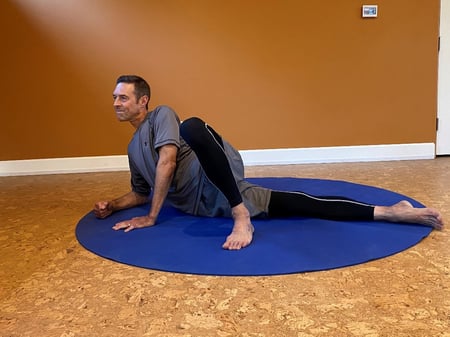
Repeat until no further gain in mobility, then switch to next stretch. - Focus a little more toward TFL with a very slight rotation of pelvis toward floor (Fig. 2c).
Then rotate slightly toward ceiling to focus more on the glutes (Fig. 2d).
Do both movements if both are tight or choose the one that needs it most. Repeat until no further gains are made. - Return to modified plank position, then after dropping hip simultaneously raise just the foot toward ceiling to target the entire central IT band down into the lateral calf-ankle-foot connection (Fig. 2e).
Repeat until no further gains are made.
Step 2 Progress the stretch
- Get into Step 1 initial position, then slightly bend bottom knee until increased stretch felt (Fig. 2f).
- Repeat sequences in Step 1 in this new position (Fig. 2g).
- Progress this stretch further by increasing knee flexion as needed.
Vastus Lateralis-IT Band stretch
This movement assesses and stretches one of the quadriceps - vastus lateralis - that connects underneath the IT band and its related fascia.
Steps to assess and stretch
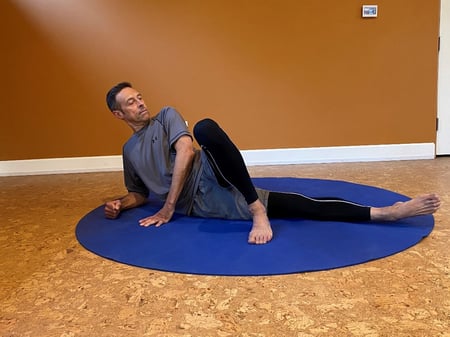
- Get into the side lying position with both legs flexed to 90 degrees at the hip and knee, then wrap hand around foot of top leg and flex knee as much as possible (Fig. 3a).
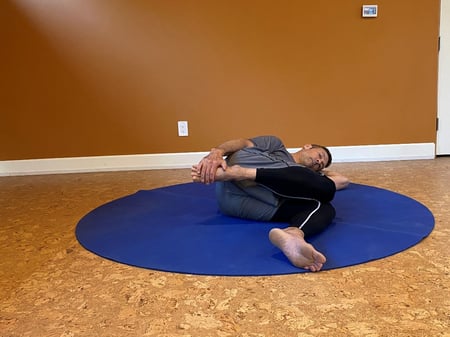
Use a towel, belt or band to assist if the foot cannot be reached. - Guide the top leg backward, letting the knee drop down toward or on the floor (Fig. 3b),
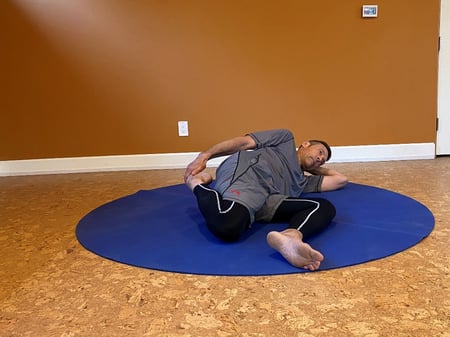
until stretch is felt anywhere from lateral quadriceps on up to lateral thigh (vastus lateralis muscle). - Repeat until no further gain in mobility, then switch to other side and repeat all stretches from the beginning or just the ones assessed to be tight or restricted.
Why stretch other muscles besides the IT band?
As can be seen in Figure 4, the gluteus maximus (especially the superior fibers) attaches posterior to the midline of the IT band, while the TFL (tensor fascia latae) attaches anteriorly. Either muscle can lead to imbalances in posture and function based on its line of pull on the IT Band. In posture, a short and tight TFL often contributes to an anterior pelvic tilt.
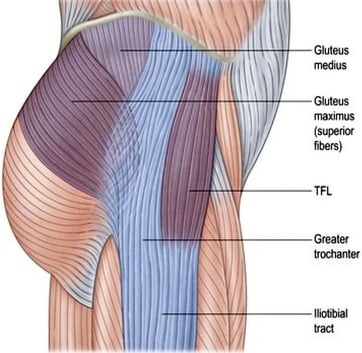
A short tight glute will contribute to a posterior pelvic tilt. That is why the previous stretches were organized first to assess whether the TFL, the glutes, or both were tight and restricted. The assessment will determine whether a region needs stretching or not so that the stretching is more effective and time is more efficient, targeting only the affected tissues.
The effects of either imbalance can also transmit forces of excessive tension down the IT band and into the lateral quadriceps called the vastus lateralis (VL). If the tension is coming from a tight TFL and anterior pelvic tilt, it can tighten the anterior part of the VL. If the tension comes from the glutes and a posterior pelvic tilt, it can tighten the posterior part of the VL. Since the quadriceps are four connected muscles, any of them will also be affected by the trickle-down effect of tension transmission along the kinetic chain.
The thicker IT band is actually part of an entire stocking-like tissue called the fascia lata which deeply surrounds the entire thigh. The IT band with its fascia lata covers and attaches to the vastus lateralis, especially where it inserts into the lateral knee region (Figure 5).
At the lateral knee in Figure 5, it can be seen from the IT band attachments that any tightness or restriction here will lead to imbalances at the patella (kneecap), knee joint itself, and surrounding tissues. That is the reason the previous stretches included variations that involved bending and straightening the knee and rotating the pelvis and entire leg to target specific tissues of the IT band and its other attachments.
Finally, to complete the kinetic chain and literally 'tie it all together' by way of the body's connective tissue called 'fascia', there is a sling of muscles and fascia (together called 'myofascial') that functionally work together. As shown in Figure 6,
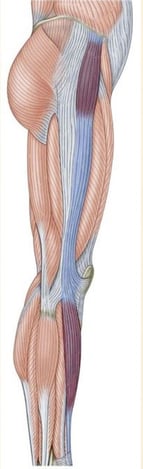
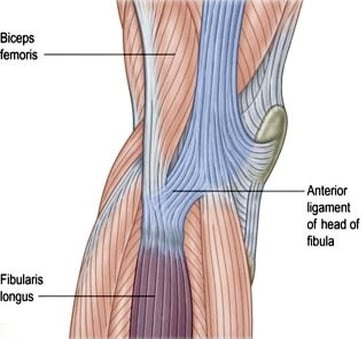
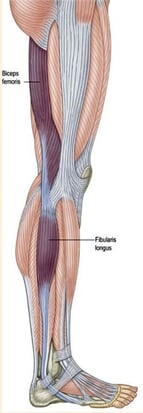
the front part of the sling passes down the front edge of the TFL and IT band and the anterior tibialis muscle. Ending in the foot, it connects with the fibularis (peroneus) longus and runs up along the back edge of the vastus lateralis-IT band where it meets the biceps femoris (lateral hamstring) in Figure 7.
Due to the extensive connections of muscles and fascia in this sling, any imbalances of strength or flexibility will be reflected in functional tests like the overhead press and others. For example, instead of thinking one should just stretch a tight TFL for problems in movement related to an anterior pelvic tilt, think of the entire sling of connections.
As described in all the stretches for the IT band previously, assessing the entire sling for restrictions, then stretching only what is necessary will have better results and save time by often correcting all the imbalances simultaneously. Then one can focus on having fun performing at one’s best!
References:
- Frederick, A., Frederick, C. (2017). Stretch to Win (2nd ed). Champaign, IL: Human Kinetics.
Myers, T.W. (2021). Anatomy Trains (4th ed). Elsevier Limited.