

After hours of sitting at your desk, sitting behind the wheel, and sitting on the couch, the glutes can become underactive. Over time, our bodies adapt to long hours of sitting, resulting in unwanted back pain and tightness, along with some faulty movement patterns.
One way to help reverse this issue (in addition to breaking up sitting time) is to incorporate glute bridging into your workout routine. The glute bridge is most often used as an exercise to activate the glutes and build core stability. This exercise is simple to perform and requires no equipment.
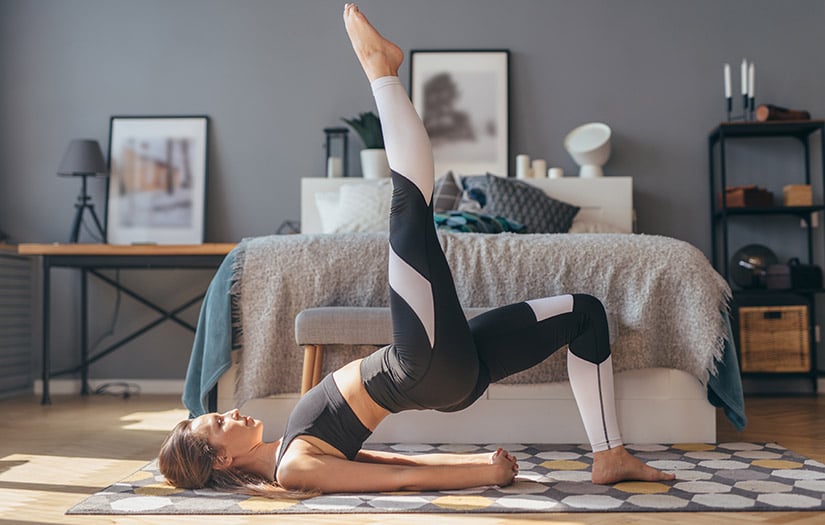
How to Perform a Glute Bridge in 5 Steps
1. Lay down on your back with your knees bent and your feet flat on the ground. Your feet should be hip-width apart with your toes pointed straight ahead, and your heels should be about 6-8 inches away from your glutes. Place your arms by your sides with your palms turned up toward the ceiling.
2. Squeeze your glutes and your abs as you start to lift your hips toward the ceiling.
3. Raise your hips as high as you can go without arching your back. The goal is to raise your hips until your body is in a straight line from your knee to your hip and to your shoulder.
4. Squeeze the glutes as tightly as you can in the top position while you hold for two seconds.
5. Slowly lower the hips down to the floor, keeping tension in the glutes and abs as you lower down.
You should feel your glutes the most during this exercise. If you feel your hamstrings working the most, try moving your feet back, closer to your glutes.
If you feel the muscles in your low back working the most, return to the starting position and reposition your back so that your hips are tucked under, and your abs are engaged. When you raise your hips up, try to maintain a neutral core position to avoid arching the low back.
Sample Glute Bridge Workout Routine
The glute bridge can be used as part of the warm-up or in the resistance training portion of the workout. Generally speaking, if you’re training in the Stabilization Endurance phase (Phase 1) of the OPT model, the glute bridge will often be used as part of the extended warm-up to activate the glutes. Here is an example workout routine for Phase 1:
| Warm-up |
| Exercise | Sets | Duration | Coaching Tip |
| Foam roll: Calves, Hip Flexors, Lats | 1 | :30 seconds | Hold on tender spot for 30 seconds |
| Static Stretch: Calves, Hip Flexors, Lats | 1 | :30 seconds | Hold the stretch for 30 seconds |
| Core/Balance/Plyometric |
| Exercise | Sets | Reps | Tempo | Rest |
| Glute bridge | 2 | 12 | Slow | 0 |
| Plank | 2 | :20 seconds | n/a | 0 |
| Single-leg Balance Reach | 2 | 8 per leg | Slow | 0 |
| Squat Jump with Stabilization | 2 | 8 | 3-5 second pause on landing | 90s |
| Resistance |
| Exercise | Sets | Reps | Tempo | Rest |
| Step-up to balance with biceps curl | 2 | 15 | Slow | 0 |
| Push-ups | 2 | 15 | Slow | 0 |
| Ball squat | 2 | 15 | Slow | 0 |
| Cable row | 2 | 15 | Slow | 90s |
| Cool Down |
| Static Stretch: Calves, Hip Flexor, Lats | 1 | :30 seconds | Hold on tender spot for 30 seconds |
If you'd like to include bridging in the workout's actual resistance portion, here is an example resistance workout for Phase 1: Stabilization Endurance. Note: you’ll want to perform a warm-up, including foam rolling and stretching, followed by a core/balance/plyometric training circuit before your resistance circuit.
| Resistance |
| Exercise | Sets | Reps | Tempo | Rest |
| Squat to cable row | 2 | 15 | Slow | 0 |
| Push-ups | 2 | 15 | Slow | 0 |
| Glute Bridge | 2 | 15 | Slow | 0 |
| Scaption on one leg | 2 | 15 | Slow | 90s |
| Cool Down |
| Static Stretch: Calves, Hip Flexor, Lats | 1 | :30 seconds | Hold on tender spot for 30 seconds |
Using Weights with the Glute Bridge
If you're using glute bridges to build strength as a resistance exercise, you can gradually add weight as your glutes get stronger. As with any exercise, proper progression is necessary to reduce the risk of injury and maximize its benefits. Start with the bodyweight version and master good form first.
Choose a weight that allows you to perform all reps with excellent form and without feeling other muscle groups (like the hamstrings and low back), trying to help to perform the exercise. When you can perform an additional two reps for two sets with good form, it's time to increase the weight.
Muscles Involved in the Glute Bridge
As the name suggests, the glute bridge primarily targets the glutes, specifically the gluteus maximus.
Your hamstrings assist in this hip extension exercise, as well as the transverse abdominis, when you keep your abs tight during the movement. When you add a resistance band just above the knee, you add extra glute activation for the gluteus medius.
The Difference Between Hip Thrusts and Glute Bridges
The hip thrust and glute bridge are both effective exercises when it comes to working the glutes. The glute bridge is more commonly used as a bodyweight exercise for glute activation, while the hip thrust is more commonly used as a glute strengthening exercise with a loaded barbell across the hips.
The main difference between the hip thrust and the glute bridge is the position. A glute bridge is performed on the ground, while the hip thrust is performed with the upper back leaning against a bench and the feet flat on the floor.
Because the shoulders are elevated on a bench, there is greater hip flexion (more bend in the hips) in the hip thrust movement, resulting in a more significant stretch of the glutes due to the increased range of motion. This means that the glutes have to work a little bit harder in a hip thrust than they do during a glute bridge.
What Are the Benefits of Glute Bridges
Glute bridges are a useful exercise for building core stability, building glute strength, and improving overall exercise form and function.
When performed as a stabilization exercise, glute bridges activate the glutes to function as they are supposed to in other movements like squats, deadlifts, walking, and running. Adding weight progresses glute bridges into a strength exercise, which can build strength in the glute muscles.
By increasing glute activation and strengthening the glutes, not only will your form get better in other exercises, but you might also gain the added benefit of reduced low back pain in your everyday life.
How Long Should I Do Glute Bridges?
This exercise can become a staple to your warm-up routine as a quick and easy way to activate the glutes. There’s no harm in performing glute bridges most days of the week as a way to wake up the glutes. When glute bridges are performed as a strength exercise, it’s best to have 1-2 days of recovery time in-between strength sessions.
Glute bridges are a simple and effective exercise that can easily be added to any exercise routine!


