

The warm summer weather is the perfect setting for people to get outdoors and participate in the activities they enjoy. However, too much of a good thing can lead to overuse injuries. Iliotibial band syndrome, or IT band syndrome, is one of these injuries.
IT Band Syndrome Statistics in Athletes
IT band syndrome is a common injury that occurs with the athletic population that accounts for:- 22% of all lower extremity injuries (1)
- 15% of injuries in cyclists (2)
- The leading cause of lateral knee pain in runners (3)
Corrective Exercise programming can greatly benefit those at risk for IT band Syndrome.
What is the IT Band?
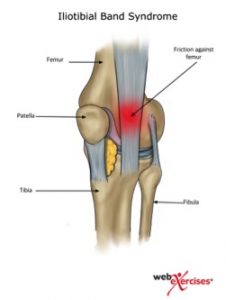 The iliotibial band (IT band), or Maissiat’s band, is a thin band of connective tissue (fascia) that extends from the pelvis through the tensor fascia latae and gluteal muscles to the shinbone.
What is IT Band Syndrome?
Iliotibial band syndrome occurs when the connective tissue (fascia) along the pelvic bone and shinbone becomes too tight and rubs against the thighbone (femur), causing pain in the knee and/or hip.
Signs and Symptoms of IT Band Snydrome
People who experience IT band syndrome typically complain of sharp or burning pain just above the joint line on the outside of the knee. The pain is generally worse at the beginning of exercise and tends to lessen as the muscles warm up, however, if the activity continues then the pain will worsen and could potentially halt the activity. Pain is also most noticeable when running downhill or just after the heel strike phase of the gait cycle. (6)
Causes of IT Band Syndrome
Several factors may contribute to the onset of IT band syndrome. Distance runners and cyclists are especially at risk.
Extrinsic risk factors include:
- Improper shoe fitting
- Incorrect bicycle seat height
- Rapid increase in mileage
- Hill training
A runner who increases mileage too fast, or a cyclist who has the bicycle seat too high or too far back will put unnecessary excess tension on the IT band, leading to injury.
Intrinsic risk factors include:
- Gluteal musculature
- Knee valgus
- IT band tightness
- Weak core musculature
4 Corrective Exercises to Treat IT Band Syndrome
Although there is some debate in the literature in regards to the exact mechanism of IT band syndrome as to whether it is caused by weakness of the gluteal muscles or due to overuse and subsequent pain causing motor control changes, the one thing that is clear is that exercise is essential for a resolution of symptoms.
This is demonstrated in several studies showing a 90% resolution with conservative care consisting of corrective exercise (12).
1. Hip Bridge with Resistance Band
An effective yet simple exercise to begin with is the hip bridge utilizing a resistance band. Researchers Choi and colleagues found that gluteus maximus EMG activity was significantly greater while anterior pelvic tilt angle was significantly lower in the glute bridge with isometric hip abduction compared to the glute bridge without the band. Therefore, they concluded that performing glute bridges with isometric hip abduction against isometric elastic resistance can be used to increase gluteus maximus EMG activity and reduce anterior pelvic tilt during the exercise. (13)

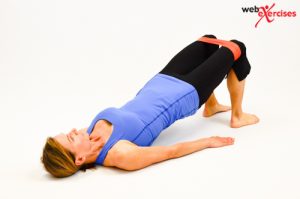
To perform this exercise:
- Begin lying on the floor…
- Place a resistance band around…
- Slightly abduct legs while simultaneously performing a hip bridge
- Slowly lower hips to start position
- Perform 3 sets of 10 repetitions
2. Side Lying Hip Abduction
The Side Lying Hip Abduction is a great way to isolate the glute medius. Distefano and colleagues looked at gluteal activation among common exercises and identified this as one of the top exercises. (14)

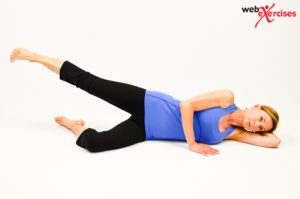
To perform this exercise:
- Begin lying on one side on the floor…
- Top leg should attain a straight line…
- Activate core muscles..
- Lift top leg upward…
- Slowly return to start
- Repeat for 3 sets of 10 repetitions
3. Lateral Band Walk
Once you have isolated the gluteus medius you can now integrate a more functional exercise with the lateral band walk. Increased hip abduction strength has been shown to improve the ability of female athletes to control lower extremity alignment. (14) When performing this exercise, the stepping motion should be performed in a semi-squat position with the knees bent rather than an upright straight leg position in order to generate greater gluteus maximus and medius muscle activity. (15)
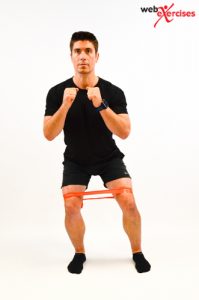
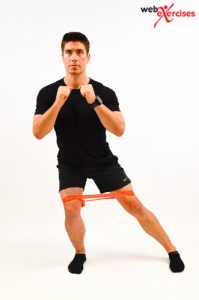
To perform this exercise:
- Begin standing with resistance band…
- Maintaining bend in the knees…
- With the lagging leg…
- Repeat for 10 steps in one direction and…
- Perform 3-4 sets.
3. Side Plank
The side plank now performed as an exercise is a great way to build core strength and endurance. However, it is important to keep the hold and resultant isometric contraction to 10 seconds or less, building strength through endurance with repetitions and not by increasing the duration. Mc Gill and colleagues showed this is the best approach as it helps keep muscles from cramping and minimizes lactic acid build up. (17) Therefore, start by performing 3-5 repetitions for 10 seconds each, gradually adding more repetitions.

4. Standing IT Band Stretch
Since the IT band attaches to the pelvis through the tensor fascia latae and gluteal muscles it is important to stretch these muscles as well. The standing IT band stretch pictured above was found to be the most effective as Fredericson and colleagues showed and average length increase of 11%.
To perform this exercise:
- Stand upright with the IT band…
- Lean to the side until a “good stretch” is felt
- Hold for 30 seconds
- Repeat 3 times
All the above displayed exercises are easy to execute and include minimal risks if performed as described. To achieve satisfying results, it is important do them on a regular basis and for a minimum of 4 weeks. The general guideline for progressing, called the “10% rule,” where total training (intensity, frequency, duration, or any combination), is not increased more than 10% per week.
Although there are many approaches to hip strengthening hopefully this has provided insight into some basic strengthening strategies. Should your client’s condition worsen at any time, an evaluation with a medical professional would be warranted.
See more IT Band Stretches by following the link to an additional blog post.
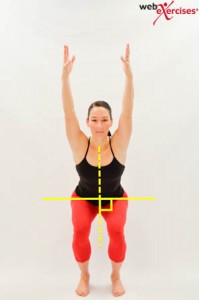
How to Use the Overhead Squat Assessment to Assess IT Band Syndrome
If you training a client, a squat assessment is a good place to start and, when done properly, can provide you with valuable information. The lower body must properly work in unison to move through triple flexion and extension of the hip, knee and ankle giving the trainer valuable insight helping to identify musculature stability and dysfunctional movement patterns. (8)
Pay close attention to the knee and if it crosses the medial malleolus. This movement dysfunction may be the result of hip musculature weakness, an ankle dorsiflexion problem or over pronation.
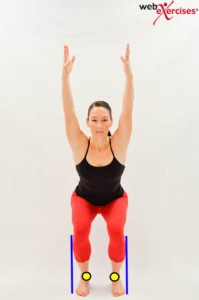
Pelvic Rotation
Pelvic rotation and tilting should be assessed as this could be due to compensation for the low back or hip musculature. Monitor the level of the hips in relationship to the floor.
Once the lower body movement pattern has been assessed, testing the core musculature is essential since the core functions as the center of all movement along the kinetic chain. (9) There are several studies in the literature that demonstrate the importance of proximal core stability and its relationship to a decrease in lower extremity injuries. (10)
Side Bridge Test
The side bridge test as described by McGill is an easy and functional way to assess the lateral core musculature. To perform, have the client positioned on either their right or left side to start with the elbow underneath their shoulder and the top foot in front of the other. Have them lift their hips off the floor and place the hand of the top arm on the opposite shoulder.
A straight-line position should be held for the duration of 90 seconds for males and 75 seconds for females. (11) Look for any movement faults including hips swaying forward or back, hips sagging downward or shoulders rotating forward. Repeat on the opposite side and compare time.

To keep track of your clients’ overhead squat assessment results, you can input their compensations into the NASM Edge app. Based on the results, it will recommend corrective exercises that you can assign to your clients. The app was recently updated with more than double the number of available exercises, and even more are on the way.
Check out these relevant resources on corrective exercise:
- Lower Crossed Syndrome: Starting From The Center
- Addressing Overactive Hip Flexors with Corrective Exercise
References:
- Linenger JMCC. Is iliotibial band syndrome overlooked? Phys sports med. 1992;20:98 108.
- Jayanta N. 2015. Effect of Hip Abductor Strengthening Among Non-Professional Cycleists with Iliotibial Band Friction Syndrome. International Journal of Physiotherapy and Research, Int J Physiother Res 2015, Vol 3(1):894-04.
- Noehren, B., et al. 2014. Assessment of Strength, Flexibility, and Running Mechanics in Men With Iliotibial Band Syndrome. JOSPT 44(3).
- Birnbaum K, Siebert CH, Pandorf T, Schopphoff E, Prescher A, Niethard FU. Anatomical and biomechanical investigations of the iliotibial tract. Surg Radiol Anat. 2004;26:433-446.
- Noehren, B., et al. 2007. ASB Clinical Biomechanics Award Winner 2006 Prospective study of the biomechanical factors associated with iliotibial band syndrome. Clinical Biomechanics 22 (2007) 951–956.
- Safran, Marc. (2012) Instructions for the Sports Medicine Patients. 2nd Edition. Saunders.
- Baker, R., et al. 2011. Iliotibial Band Syndrome: Soft Tissue and Biomechanical Factors in Evaluation and Treatment. PM R 2011;3:550-561.
- Cruz, D. July 20, 2016. Squat Form – What Does it Tell Us? Part 1 [Blog] http://blog.nasm.org/ces/squat-form/
- Akuthota, V., Nadler, S. 2004. Core Strengthening. Arch Phys Med Rehabil Vol 85, Suppl 1.
- Leetun, D., et al. 2004 Core Stability Measures as Risk Factors for Lower Extremity Injury in Athletes. Medicine & Science in Sports & Exercise.
- McGill SM, Childs A, Leibenson C. endurance times for stabilization exercises: clinical targets for testing and training from a normal database. Arch Phys Med Rehabil 1999.
- Baker, R., et al. 2011. Iliotibial Band Syndrome: Soft Tissue and Biomechanical Factors in Evaluation and Treatment. Physical Medicine and Rehabilitation. Vol 3:550-561.
- Choi, C., et al. 2014. Isometric hip abduction using a Thera-band alters gluteus maximus muscle activity and the anterior pelvic tilt angle during bridging exercise.
- Myer, G. et al. 2008. Trunk and Hip Control Neuromuscular Training for the Prevention of Knee Joint Injury. Clin Sports Med 27:425–448.
- Distefano, L., et al. 2009. Gluteal Muscle Activation During Common Therapeutic Exercises. JOSPT Vol 39(7)
- Myer, G. et al. 2008. Trunk and Hip Control Neuromuscular Training for the Prevention of Knee Joint Injury. Clin Sports Med 27:425–448.
- Berry et al. 2015. Resisted side-stepping: the effect of posture on hip abductor muscle activation. Journal of Orthopaedic & Sports Physical Therapy.
- McGill, S., et al. 2000. Lumbar erector spinae oxygenation during prolonged contractions: implications for prolonged work. Ergonomics. 43(4):486-93
- Fredericson, M., et al. 2002. Quantitative Analysis of the Relative Effectiveness of 3 Iliotibial Band Stretches. Arch Phys Med Rehabil Vol 83.