Everyone is quick to talk about “tightness.” The calves are tight; the hip flexors are tight; the low-back is tight; the shoulders and the neck are tight. It’s true that many people are tight and restricted, but what about those that have too much flexibility and are hypermobile? True hypermobility is rarer than one may think. Gebska et al. (2016) define hypermobility as “an inherited abnormality in the structure of connective tissues throughout the body, manifested by disturbances in the proportion of collagen.” Therefore, hypermobility is generally not joint specific but is experienced throughout the body.
Read on for more about about how you can utilize corrective exercise, the Beighton Score Test, and more to safely train your hypermobile clients.
how to use the Beighton score Test to determine joint hypermobility
One test commonly used to determine joint hypermobility is the 9-point Beighton Test. To perform the Beighton Test, have the individual perform each of the following on both sides of the body where applicable:
- Passive extension of the fifth finger to greater than 90 degrees—1 point given for each side that passes
- Thumb movement to the inner side of the forearm—1 point given for each side that passes
- Elbow joint hyperextension of more than 10 degrees—1 point given for each side that passes
- Knee joint hyperextension of more than 10 degrees—1 point given for each side that passes
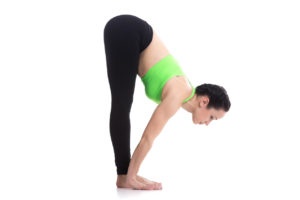
- Placing the hands flat on the floor while standing with knees straight—1 point given (Alter, 2004).
With a total possible score of 9, clinicians rate a score of 0 as tight; 1-3 as normal; and 4-9 as having ligament laxity (Bertram, 2005). While the Beighton Test is not perfect, Bertram (2005) recommends it when performing joint laxity tests on many people because of its ease of use and quick interpretation.
Further, a score of 4-9 indicates that an individual is much more likely to suffer from Joint Hypermobility Syndrome (JHS).
JHS is not determined by the Beighton Score alone. A simple questionnaire also increases the validity. Gebska et al. (2016) suggested including the Brighton Test of JHS awareness. If participants performing the Beighton test should also answer “Yes” to the following questions, then they are more likely to suffer from JHS:
- Do you have hypermobility?
- Do you notice increased joint movement range on yourself?
Joint Hypermobility Syndrome in swimmers

JHS often leads to symptoms of joint capsule and ligament laxity, which results in increased joint range of motion. Joint hypermobility predisposes individuals in some sports to injury more than other sports. Gebska et al. (2016) found that swimmers with joint hypermobility were more likely to sustain injuries to the shoulder and elbow than were rowers. Specifically, almost 80% of the injuries in swimmers with hypermobility were classified as “overuse.”
Further, joint pain was found to be three times higher in swimmers than rowers. The authors put forth the idea that the open chain nature of swimming may be one reason for the increased rates of injury compared to the closed chain nature of rowing. Grasping the oar can increase the proprioceptive input to the entire arm and shoulder, thus enhancing joint stabilization.
Gripping improves shoulder stability because it activates not only the muscles of the forearms but also the biceps and triceps. In fact, Roberts, Stinear, Lewis, and Byblow (2008) suggested that the muscles of the shoulder form synergies with the muscles of the forearm and hand to improve shoulder stabilization while using the hand.
Is keeping shoulders "back and down" a good idea?
Fitness professionals and clinicians alike frequently tell their clients to get their shoulders “back and down.” While everyone is well-intentioned, many individuals can’t get their shoulders down.
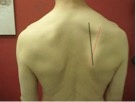
The ideal position of the shoulder blade is for the medial border to be parallel with the spine and approximately 2-3” away from the spine (Fig 1: black line). However, a common compensation is to rotate to get the shoulders down instead of depressing (Fig 1: red line).
Not only does this position decrease the subacromial space, leading to shoulder impingement, but the altered position also decreases stability. The downwardly rotated position either leads to or is caused by overactivity in the levator scapula and pectoralis minor while inhibiting the serratus anterior and rotator cuff muscles.
Thus, excessive downward rotation decreases the ability of the rotator cuff to function optimally, increasing the chances of injury in those with shoulder instability.
Fig 1.
Assessments
If the client scores at least a 4 out of 9 on the Beighton Test and answers “Yes” to the Brighton Questions, then consider the following program.
sample program for those who pass the beighton test
The emphasis in the program for those with JHS or shoulder instability is activation, stabilization, and integration, which will be discussed here. However, SMR and stretching should not be overlooked.
Since the excessive motion is experienced in the ligaments and tendons versus muscles, many individuals with JHS and instability have muscular tightness just like everyone else. Focus your foam rolling on the typical areas for shoulder dysfunction, such as the thoracic spine, latissimus dorsi, and pecs.
For stretching, individuals will often compensate by only moving through the lax ligaments versus stretching the muscles. Some assisted stretching may be indicated, but general stretching alone may need to be avoided as the individual will not know if they are moving through the area that already has too much motion or the muscles that need it.
Activation/Stabilization
Activation and stabilization become increasingly important for the individual with instability or hypermobility. However, the approach to stabilization is similar to any client working on a corrective shoulder program. Shoulder stability begins with scapular stability. If the client demonstrated more downward rotation of the scapulae, instead of the scapula truly sliding down the ribcage, emphasis should be placed on teaching proper depression. Further, optimal retraction and protraction must be taught.
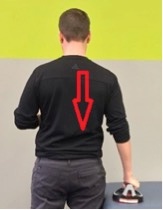
- Single Arm Depression (monitor the position of the shoulder blade to prevent downward rotation): 12 reps with 5-second isometric hold, repeat on other side
(if indicated)
- Modified Plank—Depression Protraction: 12 reps with 5-second isometric hold
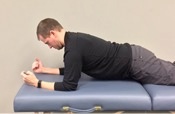
To protract, the shoulders are pulled away from the midline (rather than retracted or pinched toward the spine.)
The rotator cuff is also important as these muscles provide additional stabilization to make up for the lack of joint integrity. Two methods for taking advantage of rotator cuff activation in the client with joint hypermobility are compression and distraction.
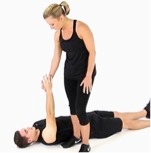
- Supine Distraction/Shoulder Packing: Stabilize shoulder as partner pulls up. The shoulder should remain retracted and properly depressed: 12 reps with 2-second isometric hold, repeat on the other side (if indicated)
- Static Push-up with Arm Lifts: Lift the arm as high as possible while maintaining shoulder stability. Alternate sides for a total of 16-20 reps

An often-overlooked technique which cannot be forgotten in the hypermobile client is perturbation training. Perturbation is when something stable is pushed out of balance and then must return to its stable state. There are many different highly-effective methods of perturbation training, such as the Body Blade that generates a wave action to increase stability demands.
However, if a tool like the Body Blade is unavailable, then a simple resistance band or tubing can suffice. Here, the movements can be active or passive. When working alone, the tubing can be anchored, and the client can actively perform small vigorous movements. When working with the fitness professional, the client can attempt to maintain a “stable position” while the fit pro perturbs the system by inducing the small vigorous movements.
- Plank with Perturbation: 60-90 seconds on each side
Integration techniques for a corrective shoulder program
Integration techniques can be like a corrective shoulder program by focusing on rowing, overhead pressing, and pushing movements. However, emphasize a few of the concepts in this article by including distraction, compression, and grip. For distraction, add a set of high-quality deadlifts into the mix.
A deadlift with good form is going to require significant shoulder stabilization and lat activation to depress the shoulder blades. For compression, a bear crawl will work on maintaining a stable protracted position enhancing shoulder girdle integrity.
To integrate grip, work on bottom-up kettlebell presses. The kettlebell doesn’t need to be heavy, but one that the client can maintain with good form, with the emphasis being on clinching the bell to enhance rotator cuff activation and stabilization.
- Dead Lift: 12-15 repetitions with emphasis on shoulder stability
- Bear Crawl: 12-15 repetitions (steps) with emphasis on shoulder girdle stability and alignment
- Bottom Up Kettlebell Press: 12-15 reps with emphasis on grip and shoulder stability


Check out These Blog Posts as Well!
References
Alter, M. (2004). Science of flexibility (3rd ed.). Champaign, Il: Human Kinetics.
Bertram, S. (2005). Hypermobility syndrome: Recognition and management for physiotherapists. Journal of Women's Health Physical Therapy, 29(3), 72.
Gebska, M., Weber-Nowakowska, K., Oklejak, M., Bockowski, R., Zyzniewski, J., & Zyzniewski-Banaszak, E. (2016). Polyarticular hypermobility and its consequences in rowers and swimmers: a preliminary report. TRENDS in Sport Sciences, 3(23), 141-145.
Roberts, L. V., Stinear, C. M., Lewis, G. N., & Byblow, W. D. (2008). Task-dependent modulation of propriospinal inputs to human shoulder . Journal of Neurophysiology, 100, 2109-2114.

