Having a client with hip replacements may seem like a daunting prospect, but in most cases the new hips function just as well as biological hips. Research suggests that 25% of the population will get hip osteoarthritis by age 85 (Murphy et al., 2010). Further, Knight, Aujla, and Biswas (2011) stated that at the time of their article there were more than 75,000 successful hip replacement procedures per year. The odds of a Personal Trainer or Corrective Exercise Specialist working with a total hip client are quite high.
Hip Replacement in context
Total hip replacement is one of the oldest and most successful replacement procedures in medicine. One of the first total hip replacement attempts occurred in Germany in 1891 (Knight et al., 2011). The materials and methods of hip replacements have evolved—thank goodness—yet the idea remains the same: a rigid femoral stem, a robust acetabular component, and bone cement or type of “grout” to improve fit.
Due to the hip being a robust and stable joint, hip replacement hardware generally doesn’t have the same types of stress applied to it such as something like a knee replacement. Because of the high shear forces at the knee, knee replacement fits are trickier than a hip. Thus, after full recovery, which is said to take up to a year, the hip can withstand many forces and move through normal ranges of motion.
Limitations of mobility for clients with hip replacements—Short-term Physical
While it is traumatic to have a steel-rod driven into the leg bone, much of the initial movement restrictions are due to the damage sustained by the joint capsule during the procedure. To access the proximal femur with a saw and get a new acetabulum glued in, the hip must be dislocated. Dislocating the hip causes significant damage to the joint capsule.
The first several weeks post-surgery, surgeons and physical therapists try to limit hip extension, adduction, and external rotation to allow the joint capsule to heal. However, because of the nature of soft-tissue injuries and healing, this also means that it’s imperative to follow the rehabilitation protocol. Once someone has been released to begin moving the hip, it’s vital that selected movements also prevent dysfunctional scar tissue from developing.
long-term Limitations in mobility for clients with hip replacements
Long-term limitations are there to prevent having to repeat the surgery. The total hip procedure involves removing a significant portion of the femur. Bone does regenerate, but slowly. One of the worst scenarios is to have a hip replacement replaced too soon because even more bone will have to be removed. Stress is needed to provoke bone growth (see Wolf’s Law), but too much and too often can have a negative impact.
For this reason, the exercise limitation most frequently prescribed is to stop running. I’ve found, with my two titanium hips, that running itself is not the devil. However, those with an unusually high-impact stride, such as heel strikers, need to consider either learning how to become a forefoot striker or cease the practice of running.
Limitations—Psychological
Psychological limitations are often more prevalent than physical limitations. A hip replacement is a major surgery requiring at least a two-night hospital stay in most cases. Surgeons use an injection into the spine to block all sensation to the affected side. Thus, immediately, and up to 24 hours after the surgery, pain is at a minimum.
However, as the nerve block begins to wear off, the feeling of a metal rod that has just been hammered (literally, visit AAOS.com to see a video) into the femur is anything but comfortable. From my experience, the toughest trials were when it came to sleeping. I spent the first two weeks sleeping in a recliner, with the hip slightly flexed.
Lying flat on my back made the pressure on my hip feel almost as though it was going to pop out of the socket. It of course never did, but this feeling lead to weeks of terrible sleep that was mentally draining. One of the most helpful things I found was to place a low-frequency vibration device (I used a vibrating foam roller) directly on the joint. The small yet continuous oscillation reduced the discomfort and allowed me to eventually get some much-needed sleep.
Total Hip Rehabilitation
As is the case with many orthopedic surgeries post-op, the initial goal is movement within safe ranges. This begins with most people up and walking around the hospital on the same day as the surgery. However, also note the previous mention of the nerve block because the first time around the hospital is by far the easiest.
Once home, the rehab typically consists of normal daily activities, such as walking (with a walker), mini-squats with support, and isometric glute, quad, and hamstring contractions. The general recommendation is to move through motions that are comfortable, not causing too much pain. But, let’s face it, nothing is going to be that comfortable.
Once home rehab is completed, and physical therapy begins, the goal is using all available ranges of motion, but then also beginning to strengthen the hips. Biomechanical models suggest that the lever arm from the center of joint to center of body mass is approximately three times the length of the lever from the center of joint to abductor muscles (Houcke, Khanduja, Pattyn, & Audenaert, 2017).
Thus, theoretically, the abductors must be able to generate a force that is three times greater than bodyweight. While this model serves a good purpose, and is still in use today, it is based on traditional views of anatomy and discount any notions of fascial loading principles.
A common movement compensation seen with hip replacements is a hip hike during single-leg activities, such as walking. Preventing or correcting this movement dysfunction requires not only hip abductor strength but also a focus on core stabilization, coordination, and strength.
exercise programs for hip replacement
First things first, always follow the doctor’s recommendations, especially if you are not a physical therapist. I personally learned the hard way with my hip replacements that the prescribed exercises have an intended purpose, and they should be followed accordingly.
The program sample below begins when the client has received permission from the surgeon or physical therapists to begin exercising on their own. Thus, many of the exercises below will be in conjunction with what the physical therapist is doing, and the goal is not to overdo anything.
Weeks 1-2: Perform each for 10-12 reps. Begin with 1 set and progress to 2 on the second week if able.
- Soft-tissue Work:
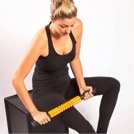
- Roller massage may be used, but it should be done with a hand-held roller using upper-body strength and not body weight compression.Roll hip flexors, quadriceps, adductors, and hamstrings on both sides for up to 60-seconds.
- Core Activation
- Breathing:
 Beginning supine, with one hand placed or small weight placed on the belly button, breath in and push the belly button into the hand. Breath out slowly as you draw your belly button towards the spine. Repeat the same process prone (if able), except the hand, doesn’t need to be placed on the belly button.
- Breathing:
- Hip Rocking

- Begin in a quadruped position with hips under knees and hands slightly in and forward of shoulders. While maintaining a neutral pelvis and spine, use the arms to push gently back into hip flexion, going only as far as comfortable. Hold the end position for 2 breathes, then pull forward so hips move slightly past knees.
- Tall Kneeling
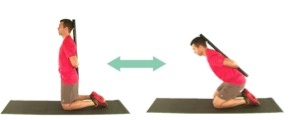
- Get on both knees if able near an open door and grab onto the doorknob and then place one hand on each side of the door (watch your fingers so you don't pinch them! An alternate starting position can be kneeling inside a doorjamb with hands on each side of door frame.).
Engage the core and set the hips back into in a slightly flexed position. Then, use the glutes to push the hips into a slightly extended position. Squeeze glutes but maintain a neutral pelvis and lumbar spine. Do not posteriorly tilt. (Picture shows the use of dowel rod to assist with alignment.)
- Get on both knees if able near an open door and grab onto the doorknob and then place one hand on each side of the door (watch your fingers so you don't pinch them! An alternate starting position can be kneeling inside a doorjamb with hands on each side of door frame.).
Week 3-4: Perform each for 12-15 reps. Begin with 1 set and progress to 2 on the fourth week if able.
- Soft-tissue Work

- Roll hip flexors, quadriceps, adductors, and hamstrings on both sides for up to 60-seconds.
- Core Activation

- Wall Plank: Standing at arms distance away from a wall, place forearms on the wall and keep the body straight from ankle to ear. Can progress by either slowly stepping the feet away from the wall or performing on a bench or table. Focus on the same breathing techniques as week’s 1-2.
- Standing Y-T-A’s:

- Stand with feet hip-width apart, perform a slight hip hinge (~45 degrees). Hold this position, focusing on the neutral pelvis and spine, then perform Y-T-A’s with the arms.
- Tall Kneeling Chops:
 Same tall kneeling position. Chops with cable, tubing, or med ball. Positioned high and pull to low. Use light resistance.
- Balance/Stability:
- Staggered Stance Cable/Tubing Row:
 Begin with feet hip-width Progress upper body by adding in alternating and single-arm rows. Then, progress lower body by narrowing base of support.
- Staggered Stance Cable/Tubing Row:
- Hip Strength:
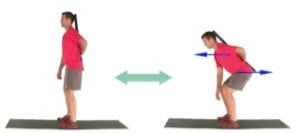
- Hip Hinge (bodyweight):Perform a modified deadlift. Focus on maintaining a neutral pelvis and spine. Squeeze glutes, but do not posteriorly tilt. (Picture below is using a dowel rod to show alignment.)
- Weighted Carry:
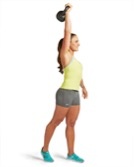
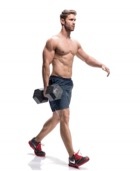 Begin with low-intensity weight on same-side as the new hip. Progress by moving to an overhead carry on the same side. Then move the weight back to a regular carry position on the opposite side. Finally, perform an overhead carry on the opposite side.
- Hip Hinge (bodyweight):Perform a modified deadlift. Focus on maintaining a neutral pelvis and spine. Squeeze glutes, but do not posteriorly tilt. (Picture below is using a dowel rod to show alignment.)
Conclusion
To conclude, treat hip replacement clients just like normal humans (while also following the doctor’s recommendations). There are structural changes, but in most cases, clients will be able to move and function almost as well as anyone else.
Be cognizant of the initial and long-term limitations, as well as the psychological struggles that are present after any surgery. With time, effort, and attention paid to core and hip stability, along with overall movement quality, the hip replacement client will be back at it, feeling better than they’ve felt in a very long time.
References
Houcke, J. V., Khanduja, V., Pattyn, C., & Audenaert, E. (2017). The history of biomechanics in total hip athroplasty. Indian Journal of Orthopaedics, 51(4), 629.
Knight, S. R., Aujla, R., & Biswas, S. P. (2011, September 6). Total hip arthroplasty--over 100 years of operative history. Orthopedic Reviews, 6(2), e16.
Murphy, L. B., Helmick, C. G., Schwartz, T. A., Renner, J. B., Tudor, G., Koch, G. G., ... Jordan, J. M. (2010). One in four people may develop symptomatic hip osteoarthritis in his or her lifetime. Osteoarthritis Cartilage, 18(11), 1372-1379. https://dx.doi.org/10.1016/j.joca.2010.08.005

