
The ability to perform a squat, goblet squat, partial squat, you name it, is an essential primal movement in life we must all be able to do, whether you are 8 or 80 years old. When we think of a squat, most of us associate the move with weight training or a specific sport activity. However, we all perform variations of a squat everyday with activities of daily living ranging from lifting a box to picking up a child or sitting down in a chair. Our ability to do this in a safe and correct manner can be the difference between injury and living a healthy, pain free life.
When done properly, the squat is a safe and effective exercise that can be used for strengthening the entire body. It is estimated that correctly performing a squat requires over 200 upper and lower body muscles to work synergistically. (17) Together, both the upper and lower body must properly work in unison to move through triple flexion and extension of the hip, knee and ankle. This exercise can also be used from rehabilitation to the sport-specific setting by simply changing the range of motion. For instance, in the rehabilitation setting, if quadriceps enhancement is the goal, then keeping the squat to less than 90 degrees is desirable since moving past this range of motion has limited benefit. (1) However, if the intent is to increase hip extensor strength, then increasing the squat depth would be beneficial. (2)
Performing a squat assessment can provide valuable information about a client and potentially reduce their risk of injury. In addition to musculature stability and postural control, dysfunctional movement patterns can also be identified. The inability to perform a squat can be a predictor of a low back or ACL injury. (2, 3, 4) In this article each body region will be discussed along with common movement faults to be aware of. Part 2 will discuss intervention strategies to correct these dysfunctions.
Performing a Squat Assessment
Ask your client to wear shorts and a short sleeve shirt for the assessment. This will make it easier to identify faulty movement patterns. Position the client so that you can observe them from the front and side, as well as being able to observe any rotational movements in the transverse plane.
To perform a squat assessment, begin by instructing the client to stand with their feet shoulder width apart (inside of their feet aligned with the outside of their shoulders). Feet should be straight forward and arms straight above head or with hands gently behind their ears (Figure 1). This position retracts their shoulder blades and activates the upper back musculature providing stability. Their head should be in alignment with their shoulders and eyes gazing straight forward.
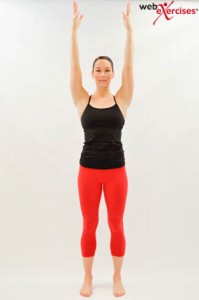
Figure 1
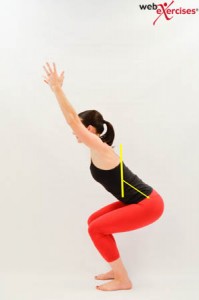
Figure 2
Instruct them to descend as far as comfortably allowed while keeping their heels on the ground and pushing the hips back as if sitting in a chair (Figure 2). The tempo should be 2-3 seconds on the way down. Do not attempt to cue them on improper movements you initially see. Have them repeat the squat 3 to 5 times. (2, 5, 6)
Head Position
Forward head posture has been associated with neck pain, shoulder pain, and temporomandibular joint dysfunction, therefore it is important to assess (Figure 3). (7, 8) Assess from the lateral (side) view watching for anterior head carriage or excessive extension of the neck. From the anterior and posterior view the head should remain in midline and not move side to side. (5, 6)

Figure 3
Eye gaze is also important to monitor as it indicates ones ability to disassociate eye from head movement. As they perform the squat, eye gaze should remain straightforward and not move upward with any head tilt. (5)
Upper Back and Scapular Position
Hyperkyphosis or excessive rounding of the upper back has been associated with forward head posture as well as limiting cervical range of motion. (9) Therefore it is important to maintain proper upper back and scapular position. When performing the squat assessment a slightly extended thoracic spine position is recommended to maintain a chest up position (Figure 4). This will also allow the scapula to be retracted. Any rounding of the shoulders and scapula protraction similar to upper cross syndrome should be quickly identifiable. (5, 6)
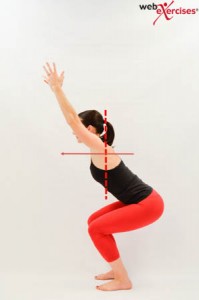
Figure 4
Low Back Position
Maintaining a neutral low back position with a slight lordosis is essential to proper and safe motion (Figure 5). Intravertebral disc pressure increases as lumbar lordosis is lost, putting one at risk for injury. (10, 11, 12) Therefore maintaining a lordosis throughout the squat movement is essential. It also allows for proper abdominal bracing necessary to maintain the intra abdominal pressure for proper support. (13)

Figure 5
Pelvic Position
Pelvic rotation and tilting should be assessed as this could be due to compensation for the low back or hip musculature. Monitor the level of the hips in relationship to the floor. If the hips lack mobility then this may be seen with excessive thoracic forward lean as the body attempts to compensate. Proper pelvic alignment also allows the muscles of the lumbar spine, erector spinae, quadratus lumborum and oblique muscles to function optimally providing support to the lumbar spine reducing the risk of injury. (5)
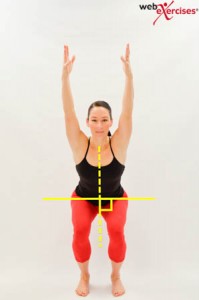
Figure 6
Knee Toe Alignment
ACL injuries occur at a four to six fold greater incidence in females than males and have been associated with increased knee valgus angles. (14, 15) Therefore assessing the knee and toe alignment from the anterior and posterior view is essential (Figure 7). As the client squats down pay close attention and note if the outside of their knee crosses their medial malleolus. (5) This movement dysfunction may be the result of hip muscular weakness, an ankle dorsiflexion problem or over pronation.
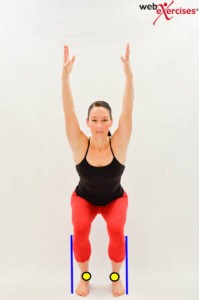
Figure 7
Tibial Translation
There is a general consensus among fitness professionals that increased tibial translation allowing the knees to glide past the toes is harmful and should be avoided. Although knee torque increases as tibial translation occurs, there is no evidence to support ones risk of injury is increased (Figure 8). (5) Conversely, if tibial translation is limited, an increase in trunk anterior lean may occur in order to compensate. This is supported by Fry and colleagues who demonstrated limited tibial translation inappropriately transfers forces to the hips and low back. (16) Therefore as a general rule, assess whether the tibia and the spine are in parallel alignment (Figure 9).

Figure 8

Figure 9
Foot Position
A stance with feet forward, or with a slight degree of external rotation, and approximately shoulder width apart is desired as a wider stance will change the torque about the knee and hips as well as the muscle activity of the lower extremities. (2) As one descends the foot pressure should shift from the mid foot toward the heel and lateral foot during this loading phase. (5) Toes should remain on the ground to maintain balance (Figure 10). From the lateral view assess if the heel is rising, which may be due to an ankle dorsiflexion limitation of the joint or from overactive gastrocnemius muscles. (18) When assessing from the anterior and posterior view, knee valgus as noted above may be the result of an over pronation problem.
See a breakdown of Squat Stance by following the link.

Figure 10
Start Position Key Points:
- Arms extended above head
- Feet shoulder width apart
- Feet pointing straight
- Eye gaze is fixed straight ahead
Bottom Position Key Points:
- Arms stay straight
- No excessive forward lean
- Feet stay pointing straight
- Heels stay on the ground
- Knees stay in line with feet
It is of utmost importance that clients are pain free when performing any movement assessment. Refer to the NASM Essentials of Corrective Exercise Training book for recommendations. Part 2 of this article will discuss appropriate corrective exercise intervention strategies based on the movement dysfunctions identified here.
Assessing this full body movement provides a foundation for designing a client’s exercise program. See how to use the results of a squat assessment to incorporate corrective exercise strategies and potentially lower injury risks.
Given the most common cause of injury is due to a previous injury in the same region and the second most common cause due to asymmetrical movement patterns, a corrective exercise strategy should be a primary goal when working with clients. (3, 4) This should consist of specific approaches to correcting movement dysfunctions thereby decreasing the risk of injury. Once this is achieved, clients can be progressed to regular fitness or sport-specific exercises.
After a client has been assessed and the movement dysfunction is identified, there are two options regarding a starting point; a ground up approach beginning with the foot and ankle complex or to correct the most noticeable movement dysfunction. Since the foot and ankle complex has the greatest potential to influence the rest of the body, as described in NASM Essentials of Corrective Exercise (5), this is a logical starting point.
However, prior to beginning it is important to first understand whether your client’s movements are truly movement dysfunctions or are present due to their unfamiliarity with the movement you’ve asked them to perform. For example, if you ask them to perform a squat and notice significant tibial translation with the knee moving past the toes it would be appropriate to further instruct them with cues. Try telling them to squat by sitting the hips back as if attempting to sit in a chair. If they still exhibit the same movement pattern as previously displayed then they are likely unable to perform this correctly.
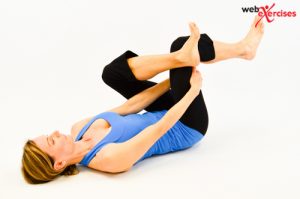
Using the above example with a client that has difficulty squatting properly, one technique to further help confirm your findings is to have them perform this same movement by removing gravity. This can be done in the supine position on the floor with the arms above the head as if they were in the starting squat position. Then instruct them to perform triple flexion of their lower body by maximally flexing the hips, knees and ankles. Although it is preferable to have them perform with the entire body at once it can be broken down, isolating the upper body and lower body to gain further insight.
If your client is unable to fully attain this triple flexed position while maintaining their arms above their head on the floor it can be assumed muscles are overactive, limiting their mobility thereby confirming your findings. However if they are able to easily attain a triple flexed position when supine but not when weight bearing, they likely have a strength deficit that prevents them from moving properly when their joints are under load. Therefore, your initial corrective strategy should emphasize either inhibiting or activating muscles depending on your findings.
For the purpose of this article a strategy for the most common dysfunctions will be presented. To begin with, ankle dorsiflexion is essential for proper movement up the kinetic chain. If the heel rises off the ground as the client performs the squat, this may be due to an ankle dorsiflexion limitation of the joint or from an overactive gastrocnemius muscle. Since ankle sprains are one of the most common injuries among active people (6) with the resultant scar tissue formation, both joint mobility and overactive muscles will be addressed.
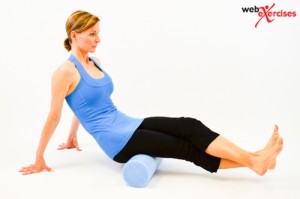
In order to inhibit and lengthen the gastrocnemius, a self-myofascial release (SMR) approach with either a foam roll or tennis ball can be utilized. SMR using a foam roll has been shown to be effective for increasing flexibility when combined with static stretching. Mohr and colleagues demonstrated this when they compared foam rolling and static stretching of the hamstring muscles. (7) Their study findings indicate using the foam roll for SMR in addition to static stretching is superior to either SMR or static stretching alone. Therefore, in order to maximize range of motion it is recommended to foam roll prior to static stretching.
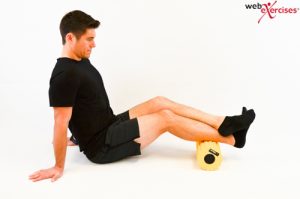
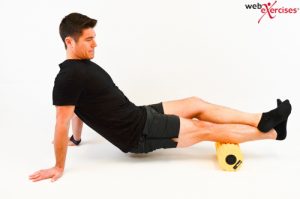
Gastrocnemius SMR - Lift hips off floor. Slowly move foam roll throughout calf muscle, as tolerated, for 1 to 2 minutes. Maintain consistent pressure. If a tender area is found, stop rolling and REST on the area for 30 seconds, then continue. Repeat 3 times daily.
Perform the half kneeling ankle mobilization exercise to address the joint range of motion. This half kneeling position puts the gastrocnemius in a mechanically shortened position eliminating this as a resistive factor. Vencenzo and colleagues demonstrated an increase in dorsiflexion range of motion after a series of mobilization exercises similar to the one described here. (8)
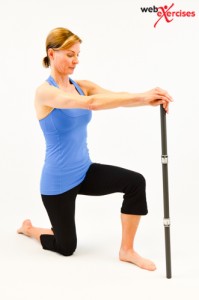
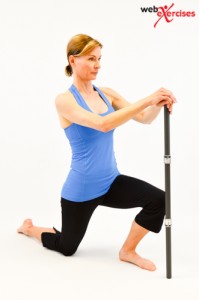
Dorsiflexion Ankle Mobilization - Begin in a half kneeling position with dowel placed by the outside of the forward foot, parallel to shin. Knee should be behind the dowel. Lunge forward keeping the front heel on the floor. Allow the knee to move past the dowel. Keep core activated so as not to hyperextend the low back. Perform 2 sets of 10 repetitions.
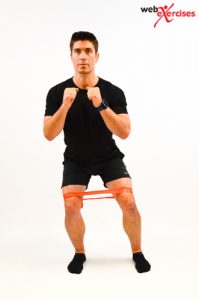
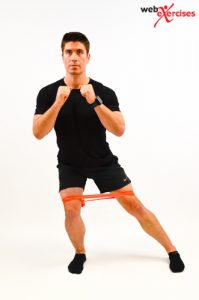
Next, identify if knee valgus is occurring. This dysfunction has been shown as a contributing factor to nearly 40,000 ACL injuries per year. (9) In order to establish lateral stability, the side step “monster walk” with knees bent is a functional and effective exercise. Increased hip abduction strength has been shown to improve the ability of female athletes to control lower extremity alignment. (10) When performing this exercise, the stepping motion should be performed in a squat position rather than an upright straight leg position in order to generate greater gluteus maximus and medius muscle activity. (11)
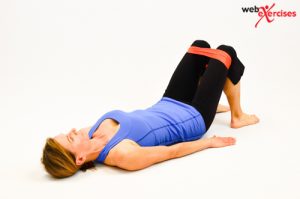
Lateral Monster Walk - Begin standing with a resistance band around the thighs just above the knees. Keep the feet and knees apart enough to put resistance on the band. Perform a ¼ squat with both feet supporting body weight. Hold squat position, shift weight fully onto one leg. Take a lateral step with the other un-weighted leg. Repeat, taking several lateral steps in one direction and then doing the same in the other direction.
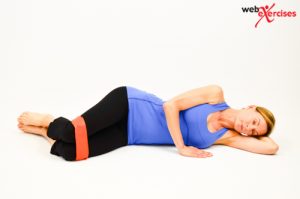
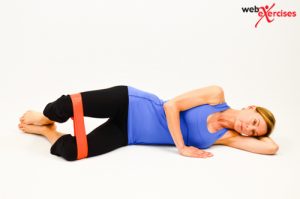
Valgus collapse of the knee can also be the result of weak hip external rotators, as identified by Paterno and colleagues who found an eight times greater risk of sustaining a second ACL injury. (12) Performing the clamshell exercise will assist in mitigating external hip rotator weakness, helping to minimize this potential risk.
Clam Shell with Resistance Band - Begin by lying on the side with knees together and bent to 90 degrees with a resistance band around knees. Lift top knee upward while keeping feet touching. Continue lifting the top knee to the point just before the pelvis begins to move. Perform 3 sets of 10 repetitions on each side.
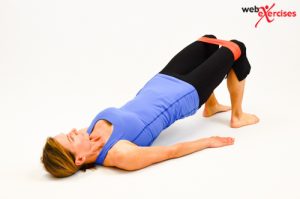
In order to establish better gluteus maximus activation, a hip bridge with a resistance band is recommended. This will also provide further benefit for improved lateral stability as well as pelvic control as demonstrated by Choi and colleagues. They found that gluteus maximus EMG activity was significantly greater while anterior pelvic tilt angle was significantly lower in the hip bridge with isometric hip abduction compared to the hip bridge without the band. Therefore, they concluded that performing hip bridges with isometric hip abduction against isometric elastic resistance can be used to increase gluteus maximus EMG activity and reduce anterior pelvic tilt during the exercise. (13)
Hip Bridge with Resistance Band - Begin by lying on the floor with knees bent and feet flat on the floor. Place a resistance band around the thighs just above the knees. Slightly abduct the legs while simultaneously performing a hip bridge. Slowly lower to start position without bringing knees together. Perform 3 sets of 10 repetitions.
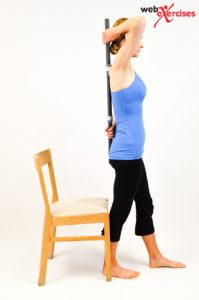
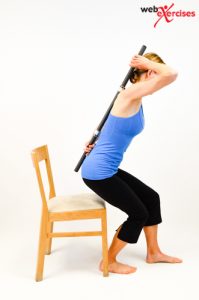
Now that improved gluteal activation has been established, the ability to properly descend while pivoting at the hips and maintaining a correct lumbar position is essential. A hip hinge drill to re-establish the correct motor pattern is done by holding a dowel along the back to cue the client to maintain a neutral spine position.
Hip Hinge - Begin standing with a chair directly behind you. Hold a dowel or similar item along the length of your spine. Stagger feet, placing one foot slightly underneath chair. Maintain neutral spine as you hinge hips, sitting down into the chair. Maintain core activation during entire movement. Upon sitting fully, maintain a neutral spine as you stand up, again paying close attention to maintained core activation. Perform 3 sets of 10 repetitions after which re-assess your client to determine if they are able to perform a proper hip hinge without the dowel. Do not progress them until they can properly perform this movement and adequately control the lumbo-pelvic complex.
If they continue to have difficulty descending properly, reassessing the posterior chain for overactive and tight hamstring and hip muscles would be appropriate. Then employ stretches as recommended by Kushner and colleagues as well as foam roll SMFR technique previously noted. (14)
Hamstring Foam Rolling – Begin seated on the floor, legs extended with foam roll under the hamstrings. Hands should be placed at sides, supporting the body. Cross one leg over the other and lift hips off of the floor. Gently move foam roll throughout hamstrings, as tolerated, maintaining consistent pressure with foam roll. Perform on each side for 1 minute with a 30 second break to rest your arms.
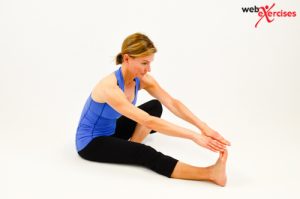
Seated Hamstring Stretch - Begin seated on floor. Extend one leg while the other is flexed inward and adjust to seated position on the sit bones (ischial tuberosities). Maintaining a flat back posture, lean and reach forward until a gentle stretch is felt behind straight leg. Hold for 30 seconds and repeat 3 times on each side.
Piriformis Stretch - Begin lying on back. Cross one leg over the other, placing ankle on opposite thigh above knee. Grasp uncrossed leg under thigh and gently pull toward chest. A stretch in the hip of the crossed leg should be felt. Hold for 30 seconds and repeat 2 times on each side.
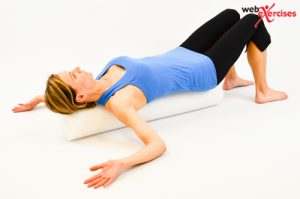
Lastly, the ability to maintain an upright chest and thoracic position with scapula retracted is important to attain a correct lumbo-pelvic position. Performing a static chest stretch on a foam roll is a great way to lengthen tight anterior chest muscles which will then allow proper scapular strengthening to occur.
Foam Roll Chest Stretch - Begin by lying on foam roll with feet flat on the floor. Foam roll should support the head and run along the spine down to the pelvis. Place arms to the sides, bending both elbows to 90º at shoulder level with palms facing up. Relax as chest and shoulders stretch for 30-60 seconds. Do not try to force arms to floor.
A lack of core stability has also been shown to influence knee injuries in female athletes as reported by Zazulak and colleagues. They demonstrated this decrease in core neuromuscular control increases uncontrolled trunk displacement leading to higher knee ligament strain and ACL injury. (15)
Therefore strengthening the deep spine and major muscles of and around the low back and core is the next step. One of the larger muscles that is integral to the stability of the spine is the quadratus lumborum as noted by McGill and colleagues. They found this muscle was “best suited to be the major stabilizer of the lumbar spine.” They further stated the “side support” or “side bridge” exercise was identified to optimally challenge the quadratus lumborum and the muscles of the abdominal wall while minimizing lumbar spinal loads. (16)
Side Plank - Begin side lying with support forearm directly under the shoulder. Activate the core muscles and lift hips to attain a straight plank position with body weight on forearm. Maintain core contraction. Hold for recommended duration ( e.g., 30 seconds). Repeat for 2 sets on both sides.

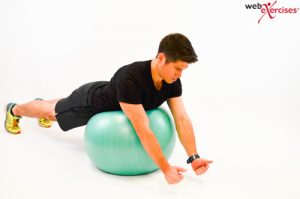
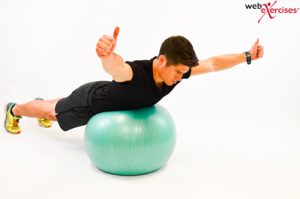
The Blackburn “Y” or horizontal abduction at 100 degree is a great way to re-establish scapular control as this exercise has been shown to elicit high EMG activity of the rotator cuff, deltoid and scapular muscles. (17)
Horizontal Abduction - Begin in a plank position on a stability ball. Arms should be extended to sides at shoulder level with hands at 10 and 2 o'clock position. Make hands into a soft fist with thumbs up. Activate core muscles. Lift hands and arms toward ceiling and squeeze shoulder blades together. Neck muscles should remain relaxed. Hold for 5 seconds. Return to start position and repeat 3 sets of 10 repetitions.
All of the suggested exercises are easy to execute and include minimal risks if performed as described. They are provided as a guideline to some of the most common movement faults identified on an overhead squat assessment. To achieve satisfying results, it is important to do them on a regular basis.
References
- Hewett TE, et al. 2005. Biomechanical measures of neuromuscular control and valgus loading of the knee predict anterior cruciate ligament injury risk in female athletes: a prospective study. Am J Sports Med. 33:492–501.
- Schoenfeld, B. 2010. Squatting Kinematics and Kinetics and Their Application to Exercise Performance. Journal of Strength and Conditioning Research 24(12):3497-3506.
- Fulton, J., et al. 2014. Injury Risk is Alstered by Previous Injury: A Systematic Review of the Literature and Presentation of Causative Neuromuscular factors. International Journal of Sports Physical Therapy. 9(5):583-595.
- Hewett, T., et al. 2013. Current Concepts for Injury Prevention in Athletes After Anterior Cruciate Ligament Reconstruction. Am J Sports Med. 41(1): 216–224.
- Clark, M.A., Lucett, S.C. (2014). NASM Essentials of Corrective Exercise Training. Burlington, MA. Jones & Bartlett Learning.
- Fong D., et al. 2007. A systematic review on ankle injury and ankle sprain in sports. Sports Med 37(1):73–94.
- Mohr, A., et al. 2014. Effect of foam rolling and static stretching on passive hip-flexion range of motion. Journal of Sport Rehabilitation.
- Vincenzino, B., et al. 2006. Initial Changes in Posterior Talar Glide and Dorsiflexion of the Ankle After Mobilization With Movement in Individuals With Recurrent Ankle Sprain. J Orthop Sports Phys Ther. 36(7):464-471.
- de Loes, M., et al. R. A 7-year study on risks and costs of knee injuries in male and female youth participants in 12 sports. Scand J Med Sci Sports. 10(2):90-97.
- Myer , G. et al. 2008. Trunk and Hip Control Neuromuscular Training for the Prevention of Knee Joint Injury. Clin Sports Med 27:425–448.
- Berry et al. 2015. Resisted side-stepping: the effect of posture on hip abductor muscle activation. Journal of Orthopaedic & Sports Physical Therapy.
- Paterno, M. et al. Biomechanical Measures During Landing and Postural Stability Predict Second Anterior Cruciate Ligament Injury After Anterior Cruciate Ligament Reconstruction and Return to Sport. Am J Sports Med October 2010 vol. 38 no. 10 1968-1978.
- Choi, C., et al. 2014. Isometric hip abduction using a Thera-band alters gluteus maximus muscle activity and the anterior pelvic tilt angle during bridging exercise. Journal of Electromyography and Kinesiology.
- Adam M. Kushner The Back Squat Part 2: Targeted Training Techniques to Correct Functional Deficits and Technical Factors that Limit Performance.
- Zazulak BT, Hewett TE, Reeves NP, et al. The effects of core proprioception on knee injury: a prospective biomechanical–epidemiological study. Am J Sports Med 2007;35(3):368–73.
- McGill, S., et al. 1999. Endurance Times for Low Back Stabilization Exercises: Clinical Targets for Testing and Training From a Normal Database . Arch Phys Med Rehabil Vol 80.
- Escamilla, R., et al. Sports Med 2009; 39 (8): 663-685.
References
1) Escamilla, RF, Fleisig, GS, Zheng, N, Lander, JE, Barrentine, SW, Andrews, JR, Bergemann, BW, and Moorman, CT. Effects of technique variations on knee biomechanics during the squat and leg press. Med Sci Sports Exerc 33: 1552–1566, 2001a.
2) Schoenfeld, B. 2010. Squatting Kinematics and Kinetics and Their Application to Exercise Performance. Journal of Strength and Conditioning Research 24(12):3497-3506.
3) Chaudhari, A., et al. 2006. The mechanical consequences of dynamic frontal plane limb alignment for non-contact ACL injury. Journal of Biomechanics. Volume 39, Issue 2, 2006, Pages 330–338.
4) Myer, G., et al. 2008. Trunk and Hip Control Neuromuscular Training for the Prevention of Knee Joint Injury. Clin Sports Med 27:425-488.
5) Myer, G., et al. 2014. The back squat: A proposed assessment of functional deficits and technical factors that limit performance. Strength Cond J. 2014 December 1; 36(6): 4–27.
6) Clark, M., Lucett, S., Sutton, B. (2014) NASM Essentials of Corrective Exercise Training. Burlington, MA, USA: Jones & Bartlett Learning.
7) Ruivo, R., et al. 2014. Cervical and shoulder postural assessment of adolescents between 15 and 17 years old and association with upper quadrant pain. Braz J Phys Ther. 2014 July-Aug; 18(4):364-371.
8) Harman, K., et al. 2005. Effectiveness of an Exercise Program to Improve Forward Head Posture in Normal Adults: A Randomized, Controlled 10-Week Trial. The Journal of Manual & Manipulative Therapy Vol. 13 No. 3, 163- 176.
9) Quek, J., et al. 2012. Effects of thoracic kyphosis and forward head posture on cervical range of motion in older adults. Manual Therapy 1-7.
10) Harrison, D., et al. 1998. Elliptical Modeling of the Sagittal Lumbar Lordosis and Segmental Rotation Angles as a Method to Discriminate Between Normal and Low Back Pain Subjects. Journal of Spinal Disorders. Vol. 11(5).
11) Panjabi, M., White, A. (1990) Clinical Biomechanics of the Spine, Second Edition, USA: LWW.
12) Callaghan, J., McGill, S. 2000. Intervertebral disc herniation: studies on a porcine model exposed to highly repetitive flexion/extension motion with compressive force. Clinical Biomechanics 16:28-37.
13) Kavcic, N., et al. 2004. Determining the Stabilizing Role of Individual Torso Muscles During Rehabilitation Exercises. Spine Volume 29, Number 11:1254–1265.
14) Myer, G., et al. 2004. Rationale and Clinical Techniques for Anterior Cruciate Ligament Injury Prevention Among Female Athletes. Journal of Athletic Training. 39(4):352–364.
15) Hewett, T., et al. 2010. Understanding and Preventing ACL Injuries: Current Biomechanical and Epidemiologic Considerations - Update 2010. North American Journal of Sports Physical Therapy. Vol. 5(4):234-251.
16) Fry, A., et al. 2003. Effect of Knee Position on Hip and Knee Torques During the Barbell Squat. Journal of Strength and Conditioning Research, 2003, 17(4), 629–633.
17) Solomonow, B., et al. 1987. The synergistic action of the anterior cruciate ligament and thigh muscles in maintaining joint stability. Am J Sports Med 15: 207–213.
18) Riddle, D., et al. 2003. Risk Factors for Plantar Fasciitis: A Matched Case-Control Study. The Journal of Bone and Joint Surgery. 85-A(5):872-877.